I started this blog as a way to showcase my creative endeavors. Scrapbooking, baking, decorating, crafting...I wanted a place that was separate from my family blog. That hasn't changed. This blog is about all the things that I'm doing to develop myself and my talents. So it's also going to showcase some of the things I'm doing to improve my physical self.
Namely...my Running Journey.
For as long as I can remember, I've loved the idea of running, but hated actually running. Maybe I just wasn't mentally ready for it...I've never been a fan of exercise in any form. In my 20's I discovered yoga, which I love, but I've still had a difficult time committing to a consistent practice. However, as I've watched my children grow, I've realized my choices will influence theirs. I've always struggled with my weight, because I hate exercise, because I love to bake, and because I love high fat comfort foods. It doesn't help that I dislike vegetables. I don't want my children to struggle. I think that finally gave me the stimulus to commit.
I started walking last summer, worked my way up to running a 5K in September. October I was plagued with injuries (not all of them running related), November was ok, but December was horrible with the crappy inversion and the sub-freezing temperatures. My body couldn't tolerate running below 25 degrees...even with multiple layers of technical clothes, I couldn't keep my legs warm enough.
Although I'm hoping for lots more snow (I do love the slopes, and I hope to be up there a lot this winter!), the warmer temperatures this week have let me get back to running. I've lost some endurance. On Tuesday morning, I was able to run about a 1/2 mile, then I had to alternate running and walking(mostly walking). I've been fighting a mild cold, so my chest was really tight and I only did about 2 miles. Wednesday morning was better, I alternated running and walking for my entire 3.2 miles. I felt really good afterward.
Last night, my cold settled into my chest, so I skipped running this morning. I'm feeling pretty good now, so I'm hoping to be able to run tomorrow.
My ultimate goal for this coming year is to be able to run The Classic 10K in September. It was the race I ran the 5K last year, and I really want to be able to run the longer race. I see a 1/2 marathon in my future, but probably not until my baby is in school all day...right now, with working night shift, and 3 kids that need me, I just don't have the time to do the longer runs in the training. It won't be long, kindergarten is next year.
My goal for January is to run 9 miles each week.

Thursday, December 29, 2011
Thursday, December 22, 2011
I have a teenager now....
...and just how was I supposed to decorate a birthday cake for my 13 year old son!? He wouldn't want anything "babyish" or remotely girly. Also, with the added possibility that my definition of girly and babyish might not coincide with his definition...
I remembered a cake that Amanda from I Am Baker made a while back...multi colored "dots". I decided to use Kyle's favorite color (green), as well as a deep blue and and orange.
First I crumb coated the cake with uncolored vanilla buttercream, and let it set up in the fridge for an hour.
Then, using the Wilton 1A tip (Thanks, Rach, for letting me borrow yours so I could have 3) I alternated colors til I had a good idea of what the pattern was. I didn't plan on the "spiky" effect, but I liked the dimension it gave the cake...
I was really happy with how it turned out, and it tasted divine! Plus, my 13 year old was really happy with it, and that was the most important thing. :)
I remembered a cake that Amanda from I Am Baker made a while back...multi colored "dots". I decided to use Kyle's favorite color (green), as well as a deep blue and and orange.
 |
| From December 2011 |
First I crumb coated the cake with uncolored vanilla buttercream, and let it set up in the fridge for an hour.
Then, using the Wilton 1A tip (Thanks, Rach, for letting me borrow yours so I could have 3) I alternated colors til I had a good idea of what the pattern was. I didn't plan on the "spiky" effect, but I liked the dimension it gave the cake...
 |
| From December 2011 |
I was really happy with how it turned out, and it tasted divine! Plus, my 13 year old was really happy with it, and that was the most important thing. :)
Saturday, December 17, 2011
Sugar Cookies
Since the beginning of our marriage (16 year ago!), every year at Christmas my husband bakes sugar cookies. I'm a great baker, and I love it, but sugar cookies are something I've never been good at. I'm just fine at making the dough, but the rolling pin and I are NOT friends. Many years ago, we just frosted the cookies and called it good. However, over the past couple of years since I've gotten into this decorating thing, I've taken over the frosting of the cookies...
The idea being to make it as easy as possible to decorate, while still making them pretty...after all we did around 7 dozen cookies.
I used my special butter cream frosting recipe....and lots of it!
Quite possibly the prettiest cookies I've ever decorated...I was almost giddy with excitement over how the snowflakes turned out!
Christmas Trees
Stars
Snowmen
And of course, the 3 Wise T-Rex's....
(I was running out of green frosting at this point, so the frosting job sucks, but the T-Rex's are for my kids, and they're not picky. For the story on the 3 Wise T-Rex's, check out my husband's blog)
I know that sugar cookies frosted with royal icing are typically "prettier", but there is just something about biting into one of these soft sugar cookies loaded with butter cream frosting that transports me to gastronomic heaven!
For frosting, I used the Wilton Star tip (21, I think). All colors were Wilton as well.
 |
| From December 2011 |
The idea being to make it as easy as possible to decorate, while still making them pretty...after all we did around 7 dozen cookies.
 |
| From December 2011 |
I used my special butter cream frosting recipe....and lots of it!
 |
| From December 2011 |
Quite possibly the prettiest cookies I've ever decorated...I was almost giddy with excitement over how the snowflakes turned out!
Christmas Trees
 |
| From December 2011 |
Stars
 |
| From December 2011 |
Snowmen
 |
| From December 2011 |
And of course, the 3 Wise T-Rex's....
 |
| From December 2011 |
(I was running out of green frosting at this point, so the frosting job sucks, but the T-Rex's are for my kids, and they're not picky. For the story on the 3 Wise T-Rex's, check out my husband's blog)
I know that sugar cookies frosted with royal icing are typically "prettier", but there is just something about biting into one of these soft sugar cookies loaded with butter cream frosting that transports me to gastronomic heaven!
For frosting, I used the Wilton Star tip (21, I think). All colors were Wilton as well.
Friday, November 25, 2011
Halloween Treats
I had a lot of fun preparing for our Halloween Harvest Party. The idea for these dipped Oreo's was conceived on The Idea Room, but I wanted to give some specific instructions and tips that helped me. I've dipped oreos for years, but always in various forms of chocolate.
Supplies
Wilton Candy Melts in White, Orange, and Green
Ghiardelli Chocolate Chips (I used Milk Chocolate)
Pretzels (for Stems)
Double Stuf Oreos
Lollipop sticks
Wilton Candy Eyes
I started out by putting the sticks in the Oreos. Immediately, I ran in to some minor problems. Even gently twisting the sticks into the cream, if I burrowed the stick deep enough inside the cream, the cookie would break, and I knew that if it wasn't in far enough the cookies would fall off as I dipped them. Then I got this idea...
I "glued" the sticks inside the oreos with some of the candy melts, and let them chill in the fridge until set up.
Then I started the dipping process...
A little note on working with candy melts...I know they say on the package that you can microwave them, but I did that with the first batch of orange and was NOT happy with the consistency. Using a double boiler (in my case, a glass bowl on top of a pan of boiling water) provided a much smoother texture and consistency.
For the pumpkins, I broke straight pretzel sticks into pieces, and placed them in the freshly dipped oreos..
For the leaves, I put the Wilton Leaf tip on a decorating bag, and using melted green candy melts, piped on the leaves.
The mummies were much of the same. After "glueing" the sticks in, I dipped them in the white candy melts. I let them set up until mostly firm, then piped the "bandages" using a decorating bag that I cut the tip off to the size I wanted (do it a little at a time until you get the size of strip you want).
I got even smarter by the time I started the chocolate spiders...I used the oreo container to prop the sticks while they set up...
I used the pretzels for the spider legs as well, but it was a little problematic. They kept catching on things and breaking off...on The Idea Room, she used candy strings, but I couldn't find anything like that at Walmart or Target.
The finished product...
I'm sorry it's practically December, but I can't seem to catch up...:)
Supplies
Wilton Candy Melts in White, Orange, and Green
Ghiardelli Chocolate Chips (I used Milk Chocolate)
Pretzels (for Stems)
Double Stuf Oreos
Lollipop sticks
Wilton Candy Eyes
I started out by putting the sticks in the Oreos. Immediately, I ran in to some minor problems. Even gently twisting the sticks into the cream, if I burrowed the stick deep enough inside the cream, the cookie would break, and I knew that if it wasn't in far enough the cookies would fall off as I dipped them. Then I got this idea...
 |
| From October 2011 |
I "glued" the sticks inside the oreos with some of the candy melts, and let them chill in the fridge until set up.
Then I started the dipping process...
 |
| From October 2011 |
A little note on working with candy melts...I know they say on the package that you can microwave them, but I did that with the first batch of orange and was NOT happy with the consistency. Using a double boiler (in my case, a glass bowl on top of a pan of boiling water) provided a much smoother texture and consistency.
For the pumpkins, I broke straight pretzel sticks into pieces, and placed them in the freshly dipped oreos..
 |
| From October 2011 |
For the leaves, I put the Wilton Leaf tip on a decorating bag, and using melted green candy melts, piped on the leaves.
 |
| From October 2011 |
The mummies were much of the same. After "glueing" the sticks in, I dipped them in the white candy melts. I let them set up until mostly firm, then piped the "bandages" using a decorating bag that I cut the tip off to the size I wanted (do it a little at a time until you get the size of strip you want).
I got even smarter by the time I started the chocolate spiders...I used the oreo container to prop the sticks while they set up...
 |
| From October 2011 |
 |
| From October 2011 |
I used the pretzels for the spider legs as well, but it was a little problematic. They kept catching on things and breaking off...on The Idea Room, she used candy strings, but I couldn't find anything like that at Walmart or Target.
The finished product...
 |
| From October 2011 |
I'm sorry it's practically December, but I can't seem to catch up...:)
Thursday, September 29, 2011
Busy, Crazy, Etc...
Wow, it's been a long, busy 6 weeks. With our vacation, school starting, getting adjusted to school, and more traveling for my husband, I've had to choose between "doing" and "posting"...and doing has won out. :)
This summer I decided to buy all the digital scrapbooking classes that went on sale at Jessicasprague.com, so in July I purchased Up and Running v2, in August it was Now We're Rockin' v2, and I enjoyed them so much, when Digi In Deep went on sale in September, I splurged and bought it too. I had so much fun scrapbooking and learning Photoshop Elements that I want to do it all the time...I have boxes of pictures and tons of paper supplies, but the ease and convenience of the computer has stolen my heart. I have a couple of albums that are in progress that will need to be finished the "old-fashioned" way, but the future is all digi for me!
Here's what I've been up to...
Up and Running Class...
Lesson 1
This was a quick page, and it was nice to learn how to utilize it, but I found it didnt' give me enough creative control.
Lesson 2
Lesson 3
Lesson 4
I didn't learn tons from this first class...I already knew most of these basics. However, I did learn a few things about my settings that had been bothering me, and by the last lesson I was learning easier ways to do things that I had had trouble with before, so it was worth it for me.
Now We're Rockin'
This was the class where I really started learning things...and feeling comfortable enough to make my own creative substitutions.
Lesson 1
Most important thing I learned...how to sepia tone a photo. I have big plans for this one...
Lesson 2
This is where I really started to figure it out. I substituted in all of my own papers, and flipped the clipping mask layers to fit my particular photos better.
Lesson 3
I was so thrilled with this layout...it turned out exactly how I envisioned it!
Lesson 4
Learning to do a 2 page layout at the same time...pretty complex.
My layers palette had sooooo many layers...and as I didn't have any photos that fit with the theme provided with the lesson kit, I substituted in all my own papers and embellishments...and I love the results.
I was pumped after this class, so I took the opportunity when Cole went out of town to buy the next class in the series...
Digi In Deep
Lesson 1
First the actual lesson...
Changed to suit my pictures and my specific tastes.
Then, the bonus assignment...
Lesson 2
Then I wanted to see if I could remember all the steps and duplicate the page...with a few changes. I turned it into a 2 page spread...
I still have 2 lessons left of Digi In Deep...my husband is home, and it's Halloween season around here, which is a busy time for him (Check out his website for more on that) which leaves a bit less time for me. Ah, well, at least I finally feel like a proficient and creative digi-scrapper!
This summer I decided to buy all the digital scrapbooking classes that went on sale at Jessicasprague.com, so in July I purchased Up and Running v2, in August it was Now We're Rockin' v2, and I enjoyed them so much, when Digi In Deep went on sale in September, I splurged and bought it too. I had so much fun scrapbooking and learning Photoshop Elements that I want to do it all the time...I have boxes of pictures and tons of paper supplies, but the ease and convenience of the computer has stolen my heart. I have a couple of albums that are in progress that will need to be finished the "old-fashioned" way, but the future is all digi for me!
Here's what I've been up to...
Up and Running Class...
Lesson 1
 |
| From Digi-Scrapbook Pages |
This was a quick page, and it was nice to learn how to utilize it, but I found it didnt' give me enough creative control.
Lesson 2
 |
| From Digi-Scrapbook Pages |
Lesson 3
 |
| From Digi-Scrapbook Pages |
Lesson 4
 |
| From Digi-Scrapbook Pages |
I didn't learn tons from this first class...I already knew most of these basics. However, I did learn a few things about my settings that had been bothering me, and by the last lesson I was learning easier ways to do things that I had had trouble with before, so it was worth it for me.
Now We're Rockin'
This was the class where I really started learning things...and feeling comfortable enough to make my own creative substitutions.
Lesson 1
 |
| From Digi-Scrapbook Pages |
Most important thing I learned...how to sepia tone a photo. I have big plans for this one...
Lesson 2
 |
| From Digi-Scrapbook Pages |
This is where I really started to figure it out. I substituted in all of my own papers, and flipped the clipping mask layers to fit my particular photos better.
Lesson 3
 |
| From Digi-Scrapbook Pages |
I was so thrilled with this layout...it turned out exactly how I envisioned it!
Lesson 4
Learning to do a 2 page layout at the same time...pretty complex.
 |
| From Digi-Scrapbook Pages |
My layers palette had sooooo many layers...and as I didn't have any photos that fit with the theme provided with the lesson kit, I substituted in all my own papers and embellishments...and I love the results.
I was pumped after this class, so I took the opportunity when Cole went out of town to buy the next class in the series...
Digi In Deep
Lesson 1
First the actual lesson...
 |
| From Digi-Scrapbook Pages |
Changed to suit my pictures and my specific tastes.
Then, the bonus assignment...
 |
| From Digi-Scrapbook Pages |
Lesson 2
 |
| From Digi-Scrapbook Pages |
Then I wanted to see if I could remember all the steps and duplicate the page...with a few changes. I turned it into a 2 page spread...
 |
| From Digi-Scrapbook Pages |
I still have 2 lessons left of Digi In Deep...my husband is home, and it's Halloween season around here, which is a busy time for him (Check out his website for more on that) which leaves a bit less time for me. Ah, well, at least I finally feel like a proficient and creative digi-scrapper!
Wednesday, August 10, 2011
Dipped Oreos...
My family took a trip down to St. George a couple of weekends ago, and I wanted to make a treat to take along. I was pressed for time, however...I was working my normal shifts, and my husband was working out of town, so I needed something quick and easy.
I had purchased all the supplies to make chocolate dipped Oreos awhile back, and it was exactly the kind of treat I was in the mood for...
Supplies
Good quality chocolate (I prefer Ghiardelli, but this time I also had some good chocolate left over from our chocolate fondue at Christmas. I did some milk chocolate dipped ones, which are my favorite, and some semi-sweet dipped ones, which are my husband's favorite)
Oreos (I prefer either the Double-Stuf or the Seasonal ones with the colored filling...for some reason the seasonal ones seem to taste fresher)
First, melt chocolate in a double boiler, or a glass bowl over boiling water.
After the chocolate is completely melted, remove from heat and let sit for 3-4 minutes. Stir well, then begin dipping.
Place an Oreo in the chocolate.
Use a fork to coat the Oreo in chocolate
Use the fork to lift the Oreo out of the chocolate, and gently tap the fork on the bowl to remove excess chocolate (I only tap until it stops dripping, I like a thick layer of chocolate :))
Place on wax paper to set. If you're in a hurry, place on wax paper on cookie sheets, and put in your fridge or freezer for 15-20 minutes.
To add a little decoration, place candy melts or white chocolate chips in a decorating bag, twist closed, and place in hot water to melt. (I put the water in the microwave until just before it boils).
When your decorating chocolate is all melted (squeeze the bag around to get it all melted), snip off the tip of your bag a little at a time until you find the right size for your vision
Yum!
I personally ate wayyy too many of these on our family vacation...and they were a huge hit with my family!
I had purchased all the supplies to make chocolate dipped Oreos awhile back, and it was exactly the kind of treat I was in the mood for...
Supplies
Good quality chocolate (I prefer Ghiardelli, but this time I also had some good chocolate left over from our chocolate fondue at Christmas. I did some milk chocolate dipped ones, which are my favorite, and some semi-sweet dipped ones, which are my husband's favorite)
Oreos (I prefer either the Double-Stuf or the Seasonal ones with the colored filling...for some reason the seasonal ones seem to taste fresher)
 |
| From August 2011 |
First, melt chocolate in a double boiler, or a glass bowl over boiling water.
 |
| From August 2011 |
After the chocolate is completely melted, remove from heat and let sit for 3-4 minutes. Stir well, then begin dipping.
Place an Oreo in the chocolate.
 |
| From August 2011 |
Use a fork to coat the Oreo in chocolate
 |
| From August 2011 |
Use the fork to lift the Oreo out of the chocolate, and gently tap the fork on the bowl to remove excess chocolate (I only tap until it stops dripping, I like a thick layer of chocolate :))
 |
| From August 2011 |
Place on wax paper to set. If you're in a hurry, place on wax paper on cookie sheets, and put in your fridge or freezer for 15-20 minutes.
 |
| From August 2011 |
To add a little decoration, place candy melts or white chocolate chips in a decorating bag, twist closed, and place in hot water to melt. (I put the water in the microwave until just before it boils).
 |
| From August 2011 |
When your decorating chocolate is all melted (squeeze the bag around to get it all melted), snip off the tip of your bag a little at a time until you find the right size for your vision
 |
| From August 2011 |
Yum!
 |
| From August 2011 |
I personally ate wayyy too many of these on our family vacation...and they were a huge hit with my family!
Tuesday, August 2, 2011
Filled Cupcakes
I LOVE buttercream frosting. There is never too much frosting for me! One of my favorite things to do is fill my cupcakes up with frosting....
One of my friends at worked asked when I would be bringing treats again. I asked her when she was working, and then asked her what she wanted. She just wanted something with "your yummy frosting", so I decided to make cupcakes and fill them.
Of course, I was rushed for time, and forgot to take pictures of the process.
Filling cupcakes is actually much easier than you might think. First, bake your cupcakes and let them mostly cool. Prepare your frosting, and put it in a frosting bag with a large tip on it (I like the Wilton 1m for filling). Just push the tip into the top of your cupcake, and squeeze in frosting until the top of your cupcake starts to crack. I like to fill all my cupcakes first, then go back and frost the tops.
For this batch, I tinted the frosting a pretty lavender (purple is my friends' and my favorite color), and used the Wilton 1A tip to frost them...
(I was disappointed that the frosting color faded the next day...I need to invest in better colors than the Wilton ones I guess).
And the insides...
These were really yummy, and got devoured at work.
One of my friends at worked asked when I would be bringing treats again. I asked her when she was working, and then asked her what she wanted. She just wanted something with "your yummy frosting", so I decided to make cupcakes and fill them.
Of course, I was rushed for time, and forgot to take pictures of the process.
Filling cupcakes is actually much easier than you might think. First, bake your cupcakes and let them mostly cool. Prepare your frosting, and put it in a frosting bag with a large tip on it (I like the Wilton 1m for filling). Just push the tip into the top of your cupcake, and squeeze in frosting until the top of your cupcake starts to crack. I like to fill all my cupcakes first, then go back and frost the tops.
For this batch, I tinted the frosting a pretty lavender (purple is my friends' and my favorite color), and used the Wilton 1A tip to frost them...
 |
| From August 2011 |
(I was disappointed that the frosting color faded the next day...I need to invest in better colors than the Wilton ones I guess).
And the insides...
 |
| From August 2011 |
These were really yummy, and got devoured at work.
Thursday, July 21, 2011
Learning Lots...
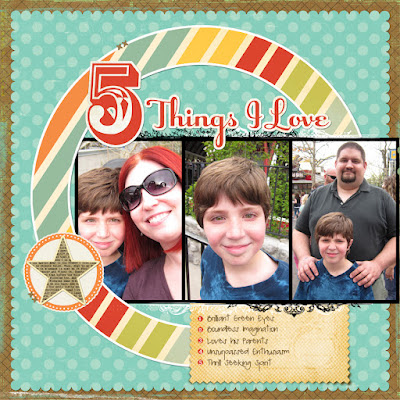
Not all of my creative moments are culinary. I have also fallen in love with Digital Scrapbooking this past year. My favorite place to buy supplies is jessicasprague.com, and I'll admit that part of it is because my good friend Mindy is on their creative team, and I love to see her featured. However, I also adore their designers. Last month they had a huge birthday sale, and I bought all the episodes of Jessica Sprague's "Photoshop Friday" before they were retired. They are mini lessons---each covering a specific technique in Photoshop. I have made it through lessons 1-6, and this is what I've accomplished/learned...
Episode 1: Create a Masked Outline
(all supplies came from the kit I downloaded with the mini-class)
Episode 2: Custom Shape Clipping Masks
(all supplies from the kit I downloaded with the mini-class)
Episode 3: Hand-Drawn Clipping Masks
(The hand drawn mask was that cool banner at the top...I used the template that I downloaded from the kit included with the mini-class, but I changed the paper to Echo Park's Sidewalk Chalk line...I love Echo Park so much!!!)
Episode 4: Custom Circle Embellishment
(Template from the kit included in the mini-class, but the paper is from In the Making's Valpolicella collection)
I really loved making this page about me and my very best friend/sweetheart! I don't often concentrate on the two of us when scrapbooking, everything seems to revolve around the kids. It was nice to remember some of the reasons I love being married!
Episode 5: Selective Black and White
(all supplies were from the kit included with the mini-class)
Episode 6: Custom Digital Brush from Clipart
(all supplies from the kit included with the class)
although...I didn't actually apply the lesson to this layout. I didn't love the clip art included with the kit, and I didn't really have any pictures that went along with the theme followed in the layout shown in the lesson. I used the lesson instead to make my watermark into a digital brush...which makes watermarking my pictures much easier.
I actually did all these layouts a few weeks ago...my July has been so crazy I haven't had a chance to do any more of the lessons. I also purchased 2 bigger self paced classes on sale...Digital Scrapbooking: Up and Running with Photoshop, and Photo Editing: Good to Great workflow. These are both beginner classes, and although I figure I know a few things that will be taught, I will learn a lot that I don't know yet. I can hardly wait until I have time to sit down and do more of my Photoshop Friday Episodes, as well as my two longer classes. Unfortunately, now that I'm a single parent 5 days of the week, it's looking like it might be until school starts before I have much time to focus on my scrapbooking again.
I highly recommend jessicasprague.com to any digital scrapbooker out there!
Episode 1: Create a Masked Outline
 |
| From Digi-Scrapbook Pages |
(all supplies came from the kit I downloaded with the mini-class)
Episode 2: Custom Shape Clipping Masks
 |
| From Digi-Scrapbook Pages |
(all supplies from the kit I downloaded with the mini-class)
Episode 3: Hand-Drawn Clipping Masks
 |
| From Digi-Scrapbook Pages |
(The hand drawn mask was that cool banner at the top...I used the template that I downloaded from the kit included with the mini-class, but I changed the paper to Echo Park's Sidewalk Chalk line...I love Echo Park so much!!!)
Episode 4: Custom Circle Embellishment
 |
| From Digi-Scrapbook Pages |
(Template from the kit included in the mini-class, but the paper is from In the Making's Valpolicella collection)
I really loved making this page about me and my very best friend/sweetheart! I don't often concentrate on the two of us when scrapbooking, everything seems to revolve around the kids. It was nice to remember some of the reasons I love being married!
Episode 5: Selective Black and White
 |
| From Digi-Scrapbook Pages |
(all supplies were from the kit included with the mini-class)
Episode 6: Custom Digital Brush from Clipart
 |
| From Digi-Scrapbook Pages |
(all supplies from the kit included with the class)
although...I didn't actually apply the lesson to this layout. I didn't love the clip art included with the kit, and I didn't really have any pictures that went along with the theme followed in the layout shown in the lesson. I used the lesson instead to make my watermark into a digital brush...which makes watermarking my pictures much easier.
I actually did all these layouts a few weeks ago...my July has been so crazy I haven't had a chance to do any more of the lessons. I also purchased 2 bigger self paced classes on sale...Digital Scrapbooking: Up and Running with Photoshop, and Photo Editing: Good to Great workflow. These are both beginner classes, and although I figure I know a few things that will be taught, I will learn a lot that I don't know yet. I can hardly wait until I have time to sit down and do more of my Photoshop Friday Episodes, as well as my two longer classes. Unfortunately, now that I'm a single parent 5 days of the week, it's looking like it might be until school starts before I have much time to focus on my scrapbooking again.
I highly recommend jessicasprague.com to any digital scrapbooker out there!
Monday, July 4, 2011
Cake Pops
I've been wanting to make Cake Pops for awhile. Bakerella is the original inventor of these, she even has a book out with all kinds of different recipes and decorating ideas.. However, I really wanted to muddle through it on my own. I needed a treat to take to my husband's family party on July 3rd (for more info on that, check out my family blog) and I wanted something fun and easy to eat outside.
I had read somewhere along the line that the cake pops were cake, mixed with frosting, then dipped in candy melts. So, first I prepared 2 cakes, one chocolate and one yellow.
This might be the right time to mention that I ALWAYS do homemade cakes. And Frosting. I have rarely used jarred frosting in a pinch, and I do keep a couple cake mixes on hand for when my husband is feeling domestic, but overall, my homemade cake and frosting recipes are so good, I just can't bear to use a box mix.
So, I made the cakes (recipes to come another time). I let them cool overnight. I prepared my frosting the next morning, then I crumbled up the cakes...
Placed them in my wonderful mixer...
and added my frosting a little at a time until the cake started sticking to itself.
I let the mixture cool in the fridge for about 4 hours. Then I rolled the cake into balls, stuck in the sticks, and put them back into the fridge for a couple hours (next time, I'll freeze them).
I melted the candy melts in the microwave, then dipped the cake pops in them...
Then I put on sprinkles and colored sparkles.
I wanted them to dry all nice and round, so I punched holes in a shoebox, and dried them right side up. I didn't take a picture of that, and it might have had something to do with the fact that my counter was covered in sprinkles and sparkles...seriously, they were everywhere, I need to work on my application technique.
The finished product...
They were a hit at the party, I got rave reviews. I even took the leftovers to work the next night, also to rave reviews. One of the parents at work even decided to help himself...(okay, that was a little weird, and we had to hide them after that.)
It was a relatively easy process, but it was time consuming. However, I enjoyed every minute of it!
I had read somewhere along the line that the cake pops were cake, mixed with frosting, then dipped in candy melts. So, first I prepared 2 cakes, one chocolate and one yellow.
This might be the right time to mention that I ALWAYS do homemade cakes. And Frosting. I have rarely used jarred frosting in a pinch, and I do keep a couple cake mixes on hand for when my husband is feeling domestic, but overall, my homemade cake and frosting recipes are so good, I just can't bear to use a box mix.
So, I made the cakes (recipes to come another time). I let them cool overnight. I prepared my frosting the next morning, then I crumbled up the cakes...
 |
| From July 2011 |
 |
| From July 2011 |
Placed them in my wonderful mixer...
and added my frosting a little at a time until the cake started sticking to itself.
 |
| From July 2011 |
 |
| From July 2011 |
I let the mixture cool in the fridge for about 4 hours. Then I rolled the cake into balls, stuck in the sticks, and put them back into the fridge for a couple hours (next time, I'll freeze them).
 |
| From July 2011 |
I melted the candy melts in the microwave, then dipped the cake pops in them...
 |
| From July 2011 |
Then I put on sprinkles and colored sparkles.
I wanted them to dry all nice and round, so I punched holes in a shoebox, and dried them right side up. I didn't take a picture of that, and it might have had something to do with the fact that my counter was covered in sprinkles and sparkles...seriously, they were everywhere, I need to work on my application technique.
The finished product...
 |
| From July 2011 |
They were a hit at the party, I got rave reviews. I even took the leftovers to work the next night, also to rave reviews. One of the parents at work even decided to help himself...(okay, that was a little weird, and we had to hide them after that.)
It was a relatively easy process, but it was time consuming. However, I enjoyed every minute of it!
Subscribe to:
Comments (Atom)